
How to Assemble K-D Storm Sash
SCROLL DOWN FOR DETAILED DIRECTIONS
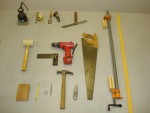
1- Tools and Materials Needed
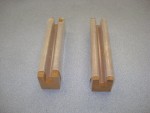
2- Preparing the Sash for Assembly
3- Laying Out and Putting the Sash Together.
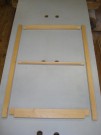
4- Clamping the Joints Tight and Square
5- Pinning the Joints
6- Trimming and Sanding the Sash
7- Notes on Gluing Sash Joints (Optional)
For more information on any of the following items, click linked text or image below.
|
Tools and Materials Needed Obtain the Following Tools and Materials Before Starting Work Tools Used in Sash Assembly - Optional Tools Shown On Back Row |
|

|
Preparing Sash for Assembly Chamfering Tenon Ends Prior to Assembly and Making Grooved Clamp Blocks Chamfering Tenons with Chisel |
|
|
Laying out Sash Components and Putting Together Sash 1- Parts Set Out - 2- Put on Rails- 3- Drive Rails In with Mallet- 4- Put on Second Stile- 5- Drive Stile on with Mallet 1- Sash Parts Laid Out on Table |
|

|
Clamping the Sash Together Clamping Up the Joints and Keeping the Sash Square Clamping Center Rail |
|

|
Pinning The Joints How to Install Sash Pins Driving In Pins |
|

|
Trimming and Sanding the Sash How to Trim Off Stile Horns, Tenons, and Finish the Joints Planing Joints Flush with Block Plane |
|
|
Gluing Sash Joints Notes On Gluing Sash Joints Clamp Blocks Covered with Plastic Sheet to Prevent Blocks from Adhering to Sash |
|